Windows to the Soul
In CG, the eyes are unforgiving. For thousands of generations we have had to decipher true intent of other human beings from their eyes, because of this, we have evolved to notice the most minute, 1mm shift in eye shape. If there was one part of a digital character that was one of the most difficult to simulate and render, it would be this. Let’s talk about it.
Talking About the Eyes

First, I am going to go over some eye terminology. There’s a lot out there, but I am only going to go over what is required to give meaningful feedback in dailies. :DÂ You don’t need to be an ophthalmologist to discuss why a character’s eyes don’t look right.
The Iris – This is the round, colored circle in the eye, it encompasses the pupil, but it is not the pupil.
The Pupil – The black dot, or the hole in the iris.
The Sclera – The ‘whites of your eyes’
The Cornea – This is the bulge over the iris
Vergence – The eyes converge or turn inward to aim at the object a person is gazing at. They diverge, or turn outward when tracking something that is receding, if they diverge more than parallel, you can say the person is ‘walleyed’ (see: strabismus).
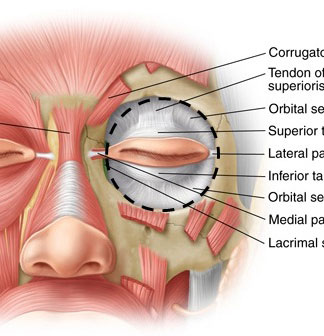
KEY TAKEAWAY – When viewing and reviewing eyes, it’s important to notice how the lids break across the iris and the shape of the negative space the lids and the iris create in the sclera. When we look at someone we are mainly seeing this shape. For more advanced readers, I picked the image above because you can really see the characteristics of the wetness meniscus, and eyelash refraction, but we’ll talk about that later.
Eye Placement
Initial eye placement is very important. Eyes too large or placed improperly will not rotate accurately when set in the face. There’s a lot you can learn by just looking at yourself in a mirror, looking at a friend, checking or scouring youtube. There’s even more you can learn from reading forensic facial reconstruction textbooks!
There are a few books for forensic artists, and most have information about placing eyes for facial re-construction. In my previous post about the jaw, I talked about forensic facial reconstruction a bit, these are my go-to books when it comes to eye (and teeth) placement:

Face It: A Visual Reference for Multi-ethnic Facial Modeling
Forensic Art and Illustration
Forensic Analysis of the Skull
Facial Geometry
I use a Mary Kay Travel Mirror and have bought them for all riggers/animators on my teams, at six bucks you can’t go wrong.
If you were to draw a line from the upper and lower orbits of the eye socket, it would be in line with the back of the cornea. I don’t usually like to point to skeletal reference, but in this case the orbits are relatively bony parts of the face that can be seen in surface anatomy.

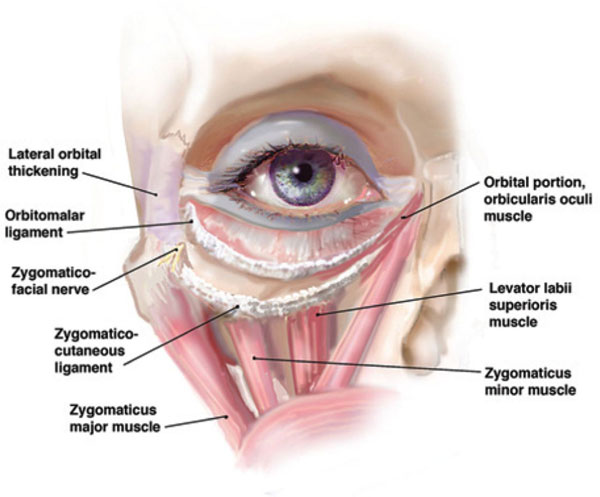
Here are some good anatomical images for centering the eye in the socket (click to enlarge):
 Â Â Â
      Â
   
And in practice; here’s eye placement from Marius, the hero Character in Ryse the video game. Notice that the eyeball doesn’t even cover the entire ocular opening when viewed front on in wireframe, as the with anatomical images above

Abdenour Bachir, Ryse 2011, Crytek (click to enlarge)

Lastly, here is a GIF I made from a video tutorial called ‘How to Paint the Human Eye‘ by Cat Reyto. It shows eye placement rather well.


So this has all been discussing eye placement in the socket, but what about eye socket placement in the face? This is where proportions come into play. The books above, “A Visual Reference to Multi-Ethnic Facial Modeling” and “Facial Geometry” are very good at discussing facial proportions and showing you how those proportions can change based on ethnicity. Here is a page from “Facial Geometry” that shows the basic facial proportions, most importantly pupil and eye placement relative to the rest of the face:

Here’s a page from the other book, which actually discusses 3D modeling. This is the chapter on eye placement, anyone interested in facial modeling should pick this up, it’s a great full color reference:

In my post about the jaw, I discussed jaw placement relative to the eyes and pupils, you can do the inverse: check the eye placement relative to teeth that you feel happy with. Notice that there’s a correlation between the molars or width of the upper teeth and the pupils.


Sometimes art direction would like ‘larger’ eyes, this is sometimes attempted by making the eyeball larger, but then it can feel weird when the eye is too large for the socket. This causes issues with the rotations of the eye. For reference, take a look at people who have been handed down a specific neanderthal gene for large eyes (or Axenfeld-Rieger syndrome), like the Ukrainian model Masha Tyelna. She has large eyeballs, but also the facial physiology to accept them:


Eye Movement

Range of Movement
Making digital humans, often from fiction, I find that these numbers are all relative, but the book Three Dimensional Rotations of the Eye, has a some good information, as does this chapter of another book: Physiology of the Ocular Movements. From default pose I usually fond that each eye can rotate on the horizontal plane 40 degrees in each direction (right and left) and 30 degrees in each direction for the vertical plane (up and down).
Eye ‘Accommodation’ and Convergence
For the purpose of rigging, the eyes are at maximum divergence (or parallel) at about 1.5m or 6 feet. I have not come across the eye gaze distance that results in maximum divergence, if you happen to have that information; let me know!
Pupils dilate to focus on a near object, this is known as accommodation. A standard young person’s eye can gaze/focus on objects from infinity to 6.5cm from the eyes. In action, eyes cannot converge/diverge faster than about 25 degrees a second.
“Why Does My Character Look Cross-Eyed”?
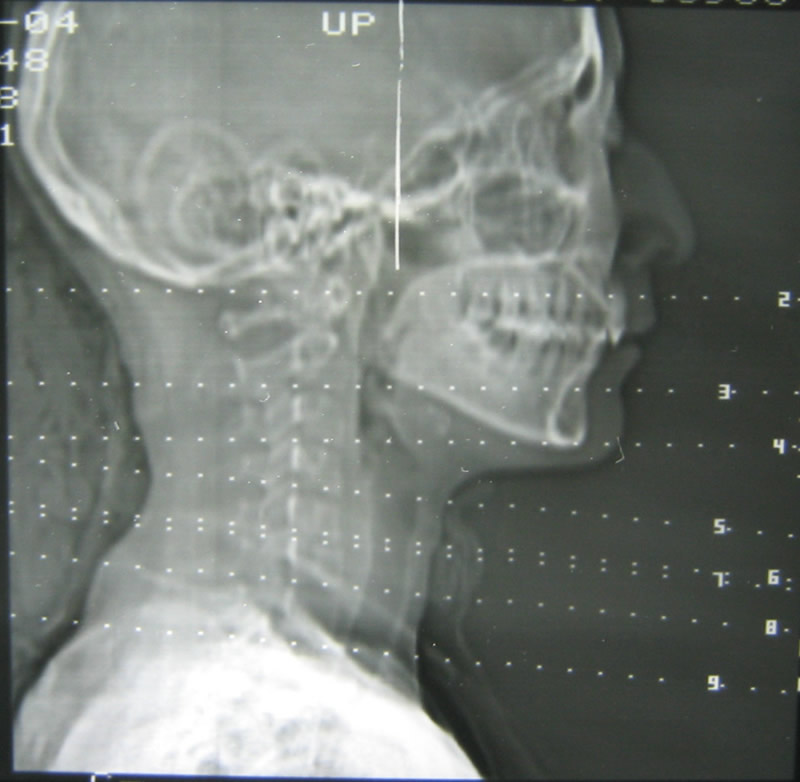
So, take a look at the MRI at the top of this page. Do you notice that the eyes are not looking forward or parallel? It’s because the eyes aren’t parallel when looking parallel/at an infinite distance. Human eyes bow out a few degrees, the amount of degrees varies between 4 and 6, per eye. The amount ‘off’ an eyeball is bowed outward is called the ‘kappa angle’, check this diagram below:

Let’s go over some more terminology:
Pupillary Axis – A line drawn straight out the pupil.
Visual Axis – A line from the fovea to the fixation target or the item being gazed upon.
Angle Kappa – the angle between the pupillary and visual axis.
The Hirschberg Test
The way ophthalmologists determine if eyes are converging properly is with the Hirschberg test. It’s a simple test where they ask a child to look at a teddy bear, and they shine a pen light into their eye, they look at his this light source reflects off the cornea, and they can tell if the child has a lazy eye/issue converging his eyes on a point.

 Doing a ‘CG Hirschberg’ test requires a renderer with accurate reflections. You place a point light directly behind the camera and have the rig fixate/gaze directly onto the camera.
For more information on Angle Kappa, as well as data on the average angle across groups of people, check out Pablo Artal’s blog posts.
KEY TAKEAWAY
Even though the eyes bow out a little bit, for all intents and purposes, as you see in the Hirschberg, the pupil still seems like it is looking at the person. So yes, the pupillary axis is off by a few degrees, but with the refraction it’s not too noticeable (<1mm reflection offset from the center of the cornea). An Angle Kappa offset should be built into your rigs, you should not have the pupillary axis converging on the fixation target, this is what causes CG characters to look cross-eyed when viewed with scrutiny.
“Why Don’t My Eyes Feel Real?”

Hanno Hagedorn, Crysis 2005, Crytek
A difficult issue with eyes in computer graphics is making them feel like they are really set in the face.
The eye has a very interesting soft transition where the sclera meets the lids. Some of this is ambient occlusion and shadows from the brow and lids, and some of it is from reflection of the upper eyelashes.
In 2005, Hanno Hagedorn and I were working on Crysis, we were having an issue with eyes that I called ‘game eye’. It’s where the sclera, has a sharp contrast with the skin. In 2005, there was no obvious solution to do this in realtime.
We (I still credit Hanno) solved this in a very pragmatic way, the following is from one of our slides at GDC 2007:

We created an ‘eye overlay’, a thin film that sat on the eye and deformed with the fleshy eye deformation. A lot of games today, including Paragon, my current project at Epic, use this technique. Many years later, a famous VFX company actually tried to patent the technique.
Here are those same meshes, six years later on Ryse: Son of Rome:

Wetness Meniscus
One thing added since Crysis is the tearline or wetness meniscus. This is very important, it’s purpose of this is to kick up small spec highlights and fake the area where the lid meets the sclera. You can see this line in photo of the female eye where I have outlined initial anatomical terms.

Eye Rendering
All of these eye parts are not easy to shade correctly, Nicolas Schulz describes how Crytek implemented a forward pass in their deferred renderer to deal with eyes in his 2014 paper The Rendering Technology of Ryse. Nicholas has two slides dedicated to eye shading:

The eye shader used on Ryse is documented in depth here [docs.cryengine.com], the modified HLSL CFX shader code is here [github]. Â Some important features of the shader include:
- Cornea refraction and scattering – this is important, it simulates the refraction of the liquid in the cornea
- Iris color, depth, self shadowing, and SSS – Since there is no physical iris, we need to fake that there is a physical form there using a displacement map (POM)
- Eye occlusion overlay depth bias – this is very important, it allows you to push/pull the depth of the overlay film, so that the eye doesn’t penetrate through it
- Sclera SSS – not to be overlooked, or else the eye looks like a golfball.

These were the images that fed into the shader features above, and below are the overlay spec and AO masks, and the spec texture for the wetness/tearline.


This is an example of the iris displacement map ingame seen with a debug render view (Xbox One, 2011)

Abdenour Bachir, Ryse, Crytek 2011
Does the eye really need a corneal bulge?
On Ryse and Crysis, we had spherical eyes, and faked the corneal bulge with a shader and fleshy eye deformation. A corneal bulge means that you really have to have your shit together when it comes to the eye deformation. All those layers mentioned above have to deform with the bulge and it can be a lot to manage across all the deformation contexts of the eye (blink directionals, squint directionals, etc) On Paragon, we have non-spherical eyes, and it’s very challenging to deform the eyes properly in the context of a 60hz e-sports title with only one joint per lid. It’s actually pretty much impossible.
Altogether
Below, you see the eyes in Ryse: Son of Rome, they feel set in the face, and consistent with the world and hyper-real style of the game. (in-game mesh and rig, click to enlarge)

Abdenour Bachir, Ryse 2012, Crytek
Scanning/Acquiring Eyes

When scanning a character’s head it’s important to get their eyes fixed at a gaze distance you have recorded. I also use the scan to see how the iris breaks across the lid and infer information about how the eye will be set in the face and skull.
- If you want to take your own eye texture reference, shoot through a ring or attach a light co-axial with the camera lens, try to get the highlight in the pupil as you will discard this part of the image anyway.
- Because the eye is shiny and it’s characteristics change as you move around it, photogrammetry often falls flat.
- Because the eye is a complex translucent lens, cutting spec with cross-polarization often also falls flat. Light loses it’s polarization when bouncing around in there.
When it comes to scanning the eyes themselves, Disney Research has published an interesting paper on the High Quality Capture of Eyes.
How You Review Eyes
First off you should check eyeball depth and placement, as shown above.
- You should be reviewing eyes with at least the FOV of a portrait lens: 80mm or a 25 degree FOV. When getting ‘all up in there’ I often use a 10 degree FOV.
- Try to review them at the distance you will see them in your shipping product.
- If you are embodying the person that is the fixation point of the digital human, you really need runtime look IK (for the eyes, but preferably feathered torso>head>neck>eyes). From some distance, you can tell is someone is looking at your eyes or your ear. Think about that. The slightest anim compression or issue in any joint from root to eyes can cause the gaze to be off a few degrees and that’s all it takes.
- If you’re doing a lot of work, build a debug view into your software that draws the pupillary axis and visual axis, all the way to the fixation/gaze point