

Its In the details: An introduction to modeling with subpatch weight in Lightwave 3D.
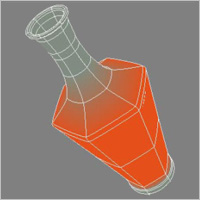 First we will discuss what subpatch weightmaps are and how they work. Weightmaps are vertex maps in Lightwave that hold various information, from deformation, to smoothing, to color. Today we will be looking at vertex weightmaps in use with modeling subpatch objects. Subpatch objects can utilize a special type of weightmap that affects the smoothing bias of each point in the object. This allows you to create objects with much more accuracy and greater control without adding complexity and geometry to the cage. The object at the right is a simple example of subpatch weight being used to add detail to a model.
Weightmaps, when applied to subpatch objects (subpatch weight), allow us to change the bias or affinity of the surface toward or away from the points. In weight shaded mode, darker red symbolizes a positive affinity, darker blue a negative and the grey/green coloring symbolizes neutral or normal subpatch smoothing.
First we will discuss what subpatch weightmaps are and how they work. Weightmaps are vertex maps in Lightwave that hold various information, from deformation, to smoothing, to color. Today we will be looking at vertex weightmaps in use with modeling subpatch objects. Subpatch objects can utilize a special type of weightmap that affects the smoothing bias of each point in the object. This allows you to create objects with much more accuracy and greater control without adding complexity and geometry to the cage. The object at the right is a simple example of subpatch weight being used to add detail to a model.
Weightmaps, when applied to subpatch objects (subpatch weight), allow us to change the bias or affinity of the surface toward or away from the points. In weight shaded mode, darker red symbolizes a positive affinity, darker blue a negative and the grey/green coloring symbolizes neutral or normal subpatch smoothing.
When working with a subpatch object, if you press "d" to bring up display properties you can turn on "Show cages" this will show you an outline of the original non subpatch geometry. Here you can see the points and select them easily.
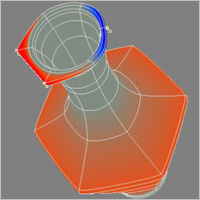 Here, cages are turned off, but you can see my point selections. Selecting the four points on the right and changing their weight to 100% changes the affinity or bias and bends the geometry out to meet the points of the non-subpatch mesh. On the other side I selected the other two points and set them to -100%. As you can see they shy away from the control points along the same direction just its inverse.
This technique is amazing for adding edges to objects without slicing them with Knife or Bandsaw. It is really amazing how many complex objects you can make with very little geometry.
Here, cages are turned off, but you can see my point selections. Selecting the four points on the right and changing their weight to 100% changes the affinity or bias and bends the geometry out to meet the points of the non-subpatch mesh. On the other side I selected the other two points and set them to -100%. As you can see they shy away from the control points along the same direction just its inverse.
This technique is amazing for adding edges to objects without slicing them with Knife or Bandsaw. It is really amazing how many complex objects you can make with very little geometry.
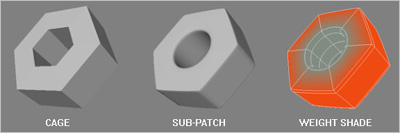 Here you can see an object that really benefits from subpatch weights. While the cage object is extremely low res, an unweughted sub-patch would need much more resolution to achieve the same look.
 When you have an object loaded up into Lightwave, look to the lower right corner. Select "W" for weightmap editing, and then pull down to "SubPatch Weight".
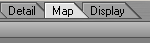 Then go to the "Map" tab at the top.
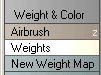 Now we want to select the "Weights" tool from under "Weight and Color" on the left side. This tool allows you to change the weight map value for a given point or set of points.
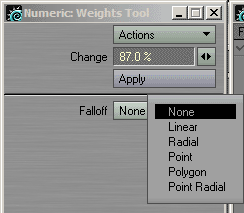 If you press "n" to bring up the numeric options for the weights tool, you will see a place where you can type in an exact amount, or add a falloff type to your selection. I find "none" to be the most useful in situations where you just want to grab some points and harden or soften them.
Now select the points you want to change and click and drag the weights tool. You will see their bias change and move to or away from the points of the cage object.
If you press "n" to bring up the numeric options for the weights tool, you will see a place where you can type in an exact amount, or add a falloff type to your selection. I find "none" to be the most useful in situations where you just want to grab some points and harden or soften them.
Now select the points you want to change and click and drag the weights tool. You will see their bias change and move to or away from the points of the cage object.

