Simulating Musculature in Maya
This is just a quick and dirty tutorial where I will briefly discuss some of the techniques I have used in the past to fake muscular deformation in Maya. This will mainly cover techniques limited to the default Maya toolset, but I will mention other options. There are many muscular effects that are difficult to emulate, flexion and extension are just the tip of the iceberg, allowing muscles to slide under the skin has always been something that was thought of as hard to do; most studios are currently tailoring cloth sim algorithms to champion a kind of global skin simulation driven by an underlying musculo-skeletal system. But be not afraid ye artists, there are other pipelines that will not reduce modelers to creating sacks to hang on musculo-skeletal volumes. For instance, Pose Space Deformation (PSD) is a great way to artistically fake many anatomical articulations. Mike Comet has just released a Pose Space Driver, and Pose Space Deformation plugin for Maya, both of which are available on his website.
Periodically I will also link to the Alias Maya Help docs on your local host, these links will be denoted by a [Docs] and will only work if you have Maya (6?) installed on your machine with it's documentation. There's also about 450k in GIFs on this page, I am sorry, but with all the different people that complain about codecs, I felt this was preferable to offering 3 versions of each little video snippet.
Under the Skin
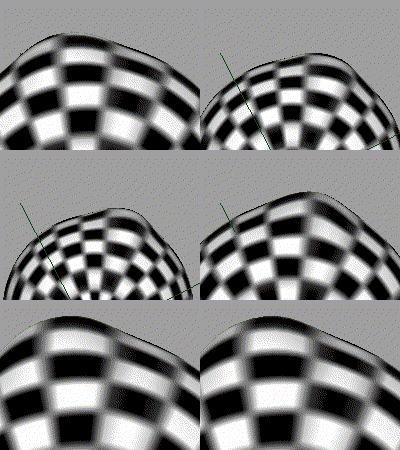
 What you are looking at here is a sphere that is moving. The sphere is being deformed by a NURBs object inside it, that is also moving, jiggling with a defined mass, flexing, and being affected by gravity. This effect is created by utilizing some of the basic deformers that Maya offers us. I'll go over some of the basic deformers I use in detail based on their use.
The Sculpt Deformer: [Docs]
The Sculpt Deformer is a sphere ('sculpt sphere') that pushes local points away from it. It has a radius of falloff, and hasn't generally been used much by TDs (to my knowledge, because it is very finicky). But here is an interesting quote from the manual: In addition to the sculpt sphere, you can also use a secondary NURBS object as the sculpt tool. Using a NURBS object as your sculpt tool is also refered to as using the custom sculpt tool. See 'To use a NURBS surface with the sculpt deformer' [Docs]. When the musculo-skeletal deformation you want requires bones or muscles sliding and moving under the skin, they can be built out of NURBs geometry and turned into 'sculpt tools' that can be parented to the skeleton and driven by it's movement.
Download the Maya Binary file you see above: [simple_test.rar] Open it up and you can pull apart exactly what you are looking at. 'Sculpt Tools' can basically be any NURBs object. By parenting these tools to the skeleton of your character, you can simulate very interesting and complex musculo-skeletal deformations, especialy in larger animals.
Flexing and Deformation
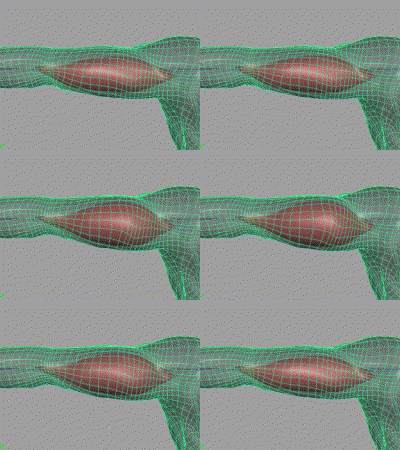
 The Wrap Deformer: [Docs] The Wrap Deformer basically allows you to deform a mesh with an internal mesh or 'muscle', much like the sculpt deformer, with the exception that the mesh's points are fixed to the object they are wrapped to. Creating a fusiform flexing motion like what you see to the left by tapering athe ends of a NURBs sphere and causing the other end to bunch up (with a blendshape) will cause the surrounding points to be deformed in a like manner. The gif at left looks odd because the arm is not bending, but it is easier to see this way. The NURBs objects you use as wrap deformer objects can be soft bodies, that jiggle, and are effected by gravity. The possibilities are limitless, just as long as your deformation order is set up correctly. The more isoparms your NURBs muscles have, the more areas will be 'glued' to the wrapped mesh.
I would also like to mention that wrap deformers calculate the entire mesh, and are very ram and processor intensive. Erick Miller and Paul Thuriot released the skinShapeDeformer with their Maya Techniques | Custom Character Toolkit DVD, which is available from Alias for $130. This deformer is like a wrap deformer with paintable weights, and it only calculates the local CVs speeding up the calculation ten fold! You need to understand that this DVD is just _amazing_, it has content and pipeline scripts and plugins that will automate and simplify rigging and virtually everything you do (unless you are already at a studio that has something similar) It is a really good insight for those that want to understand a studio pipeline and rigging for production use as well. On the same DVD is a great fusiform and multi-belly muscle model as well, just go out and buy it!
Dynamics: Soft Bodies vs. Jiggle Deformer
Jiggle Deformer: [Docs] Jiggle deformers are great in that they are quick. They solve very fast, and seem to take into account gravity and mass/weight. I started using soft bodies for my muscles, and adding gravity and any other fields to them, but that is just a pain. Not to mention that MakeCopySoft has some serious issues when you try to wrap it to another mesh. (The soft copy is not parented or bound to the original skeleton; it translates through world space. This world space translation is wrapped the the mesh, and not just the local flexing and jiggle.) The best solution to this issue is the Jiggle Deformer. One of the great things about soft bodies, is that you can go directly into the GoalPP and set the muscle insertions to stick to the insertion points/bones, BUT the Jiggle Deformer allows you to paint influence maps to do the same basic thing! It's a hack, but a good one. 'Adjusting jiggle weight by painting' [Docs] I will say that the Jiggle Deformer is a lot more finicky, but you will learn to love it.
Fusiform Muscles
Most muscles that you create under the skin will be predominantly fusiform, meaning that their bulk is in the middle and they taper at both ends. Many muscles have a fusiform shape, for example in the arm you have Biceps Brachaii, Flexor Carpi Radialis, Brachioradialis, Extensor Carpi Radialis Longus, and actually more, but I won't bore you with a detailed list. You can see a basic Biceps Brachaii in the wrap deformer example gif above. Fusiform muscles such as these are relatively easy to deal with, the easiest thing to do is create a blendshape where it contracts and have that driven by skeletal movement. You could also constrain it to two points and have it's blendshape driven by how close those two points are to one another. The Biceps Brachaii is actually 'digastirc', meaning literally "two bellies", as it branches off and has two heads. The way the body generates more power from a muscle it to give it additional heads or multiple origins/insertions, this way, it's almost like having three or four muscles pulling the same tendon. However, the technique mentioned is pretty sound and works with most fusiform muscles, because your cg musculo-skeletal system need only be rudimentary enough to generate the deformation you are after, and not be anatomically correct. Not all muscles are fusiform in shape or derivatives thereof, there are many other muscles that are much, much harder to rig and simulate because of their odd shapes and the way they move/deform, Latissimus Dorsi for instance.
Multipennate Muscle and Multi-Belly Muscle Simulation
 Multipennate muscles are those that have broad origins and insertions and sometimes bend around various other internal structures. The Latisimus Dorsi mentioned above is a good example, as are the Deltoid, and the Pectoralis (Sternal Head). At the SIGGRAPH '97 conference there was a paper presented on Anatomy-Based Modeling of the Human Musculature. In it, the authors put forth a 'multi-belly' muscle model, where you have multiple 'fusiform-like' muscles connected along the origin and insertion of a multipennate muscle. As simple as the paper looks by todays' standards, it was actually a very good idea.
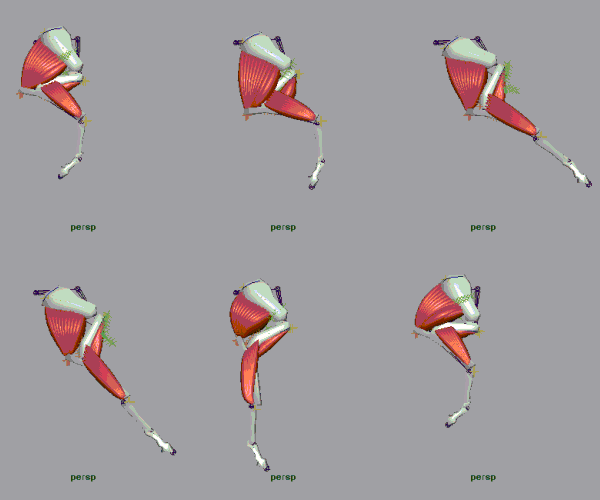
At the left you can see a horse leg I rigged with multi-belly NURBs spheres. The Triceps Brachaii of the horse is large enough and has a wide enough insertion to almost make it multipennate, and as with other large animals, I rig it accordingly. In the past I created multi-belly muscle set-ups myself, and had some small MEL scripts to help me out, but it was a very tiresom experience. Recently Judd Simantov and Mark Edwards have put out a very decent multi-belly generator for Maya that bridges two curves with multi-belly NURBs spheres, all set-up with constraints, jiggle deformers, etc. The Maya plugin and associated MEL scripts can be found at cgMuscle.com. Judd and Mark are working alongside a lot of other people in the industry, with a goal of creating an open source muscle flexing and skinning plugin for Maya; a very noble task indeed.
I have started a Muscle Reference Library that I have stocked with everything from SIGGRAPH papers, to magazine articles, to anatomy and physiology slides/text, even screen caps of industry musculo-skeletal rigs. Tell me what you think, and send me anything that you feel would be a great addition.
The Whole Schebang
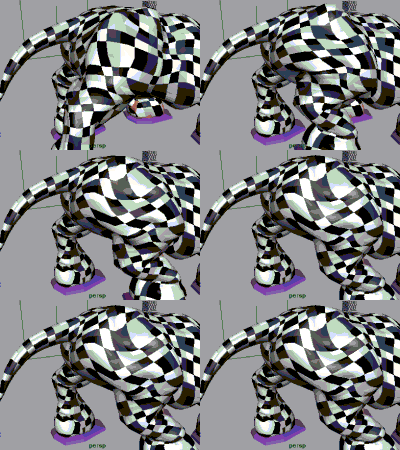
 Here is a final animated gif (non-looping) showing the leg of a large animal rigged with all of the elements mentioned above. The top skin is being deformed by a sculpt deformer, as are parts of the legs, and the flexion and jigling are from wraps and jiggle deformers. The lower res mesh is still animable, and I have switches to turn on/off the jiggle and wraps (the envelope is mapped to a control panel). Thanks to Pete for supplying me with the model to mess around with on such short notice.


