Xbox/DC/PS1/PS2/JAMMA Cabinet
Prologue: Video games, Emulation, Xbox:
My brother and I grew up with a profound love for videogames. Our first system was a TI-99, which was a really decent system, we played Parsec for weeks. We loved arcades, my brother in particular became a huge fan of fighting games. At home, I think our favorite console was the Sega Genesis. A big issue with old consoles is that ROM or cartridge based consoles have issues later on. After a while the cartridges have trouble seating correctly etc, and won't play. The Sega Dreamcast was one of the best consoles ever released, not only did it have great games, but it used a stripped down version of Microsoft's Windows operating system, so emulators and other applications could easily be ported to play on it. Emulators are programs that can 'emulate' or play old game console games. A popular Dreamcast Genesis emulator came on two CDs, and had every Sega Genesis game ROM ever released in the US/Japan! With the advent of the Xbox everything changed, the Xbox can be upgraded to a 120GB hard drive, and over time an emulator for almost every console has been ported to Xbox including MAME, which emulates almost every Arcade game, including old vector-drawn games such as Pong and Asteroids. The Xbox can also play Movies/Games/MP3s from Samba shares across a Network or off its hard drive. I decided to finally take the time to make an arcade cabinet for my brother. But I wanted it to be bale to interface with Xbox, Playstation 1/2, Dreamcast, and JAMMA, which is the arcade interface that arcade PCBs use.
Part 1 - Ze Plans:
So I basically knew what I wanted this thing to do. I sat down to plan it out, I figured I would need:
- An empty arcade cabinet
- Control parts (sticks, buttons, a JAMMA harness)
- 2 Playstation (PSX) controllers
- 2 Xbox Controllers
- 2 Dreamcast (DC) Controllers
- Small braided wire
- Some old DB25 SCSI or PPort cables
- Various overpriced parts from Radio Shack
Basically I would have a DB25 connector on the back that was hooked up to two PSX and DC controllers inside of the actual cabinet conteol panel. Then I would have a DB25 connector that was just JAMMA and JAMMA+. The Xbox control pad PCBs were huge, and I didn't really think they would fit in the control panel box, plus a lot of my brothers friends have JAMMA arcade cabinets, so I wanted him to be able to interface his Xbox with them. I decided to make an external box to allow the Xbox to connect to a JAMMA harness.
Part 2 - The XBox - JAMMA Converter:
Here is a basic rundown I made at the time:
At the top you see the basic buttons that would be present on the arcade control panel. The JAMMA spec supports only three fire buttons, and Start. JAMMA+ was a standard created by Capcom to allow the addition of three more fire buttons, because every button-mashing fighter needs lots of buttons. The Xbox needs even more buttons, for this I created my own standard, the X-Cable, which carried Analog Left Down, Analog Right Down, Left Trigger, Right Trigger, and Rumble function for both controllers. Here are some nice Pin-Outs of the cables:
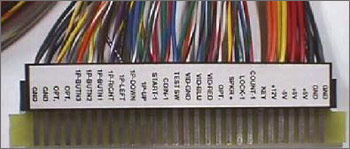
[Xbox Controller Pin-Out] - This connects the Xbox-Jamma converter to the P1 and P2 controller ports on the Xbox. It has a DB25 cable on one end then 15 feet of wire, and two Xbox controller cables on the other end. Be careful, a mistake I made was originally making the Xbox controller cable just about to the theoretical limit of USB (~20 feet). However, the Xbox USB chipset appears only to work to about 15 feet.
[JAMMA Cable Pinout] - This connects the Xbox-Jamma converter to the actual control panel of the arcade cabinet. It has a DB25 cable on one end then about 3 feet of cable, and it has a JAMMA header and a JAMMA+ molex on the other end.
[X-Cable Pinout] - This connects the Xbox-Jamma converter to the other buttons JAMMA and JAMMA+ do not support, as well as route the rumble function. It is a basic DB15 VGA cable.
The JAMMA Edge Connector pictured below was purchased online, I bought them from Bob Roberts, you can get them here on his site. He makes some of the best ones available, and they're only $2. This picture shows a JAMMA Edge Connector plugged into the JAMMA header of a JAMMA harness. You can kind of make out the markings on the connector.
Below is a JAMMA pin-out which shows you which contacts are responsible for doing what. You will be connecting your Xbox controller PCBs to the JAMMA fingerboard by following this diagram.
Every button on your control pad has two 'leads' or wires. When they meet or touch they complete the circuit and the button is pressed. The key to wiring up any control pad to other buttons is 'stringing off' the leads. You can see I have done this below; you string off the leads and then connect them to the JAMMA fingerboard. Since the Ground, or 'Common' wire is shared throughout the PCB, you only have to connect one wire to this. Even though all of the Xbox buttons are in fact analog, meaning they actually have 255 pressure levels, when they connect to ground they drop completely to 255, or in other words, one complete down button push. Analog arcade buttons are extremely rare and expensive, I have never seen or heard of anyone attempting to make an analog arcade cabinet, but it wouldn't be too hard, just very expensive and time consuming. For instance the cheapest analog arcade joystick available at happ controls is about $121.
I used two cheap 3rd party Xbox controllers, I do not suggest you do this, even the slightest electrical gradient or disruption can be enough to trigger a button push, after all, games like Soul Calibur 2 etc, register even 1/255th (1 out of 255 analog pressure, or barely anything more than slight electrical noise) as a full button push. This was a real pain. In hindsight I would buy the cheapest crappy non-analog arcade stick you can find for Xbox. This eliminates any analog problems you may run into later. You can usually find a plethora of crappy xbox arcade sticks on Ebay, or at your local game store, for some reason, the crappiest arcade sticks seem to be priced less than used 3rd party Xbox controllers. The PCBs are also smaller.
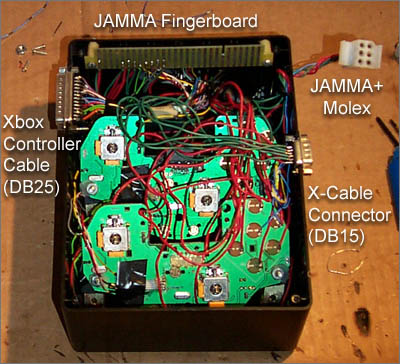
Above you can see the JAMMA Edge Connector, DB25 Xbox Controller Cable Connector, DB15 X-Cable, and 6-pin Molex JAMMA+ connector.
Part 3 - The Cabinet/Control Panel:
I called around and found a place that had a few 'empty' cabinets for sale. They wanted $100 which seemed fine at the time; it really is a pain to try to make your own cabinet. When I got there, the best condition cabinet turned out to be an old Berzerk cabinet. I couldn't believe it, the thing had been outside for ages, and was completely gutted. It actually had mud wasp nests and spiders in it. It was salvagable, and I had put off getting the cabinet for a while, making one myself would have taken too long. I decided to completely strip and repaint the Berzerk cab. The cabinet wasn't very wide, so I decided to make the control panel a lot larger. I sat down to plan the control panel, being the 3D nerd that I am I used the panel and button schematics at Happ Controls to quickly lay out a few designs in 10-15 mins. Here is the one I decided to go with:
I decided to print out the buttons at the exact sizes the specs listed at Happ Controls. I tested the layout and chose to follow one closer to below. I looked around online to see exactly what the default Xbox, PSX, and DC arcade stick button layouts were, and tried to follow, you might want to do this so that the user doesn't have to config their controls every time they pop in a game, as most games follow a certain default set-up.
Once you get to this point, you might want to take a look around some sites like ArcadeControls.com. There are plenty of people doing the exact same thing you are attempting to do and they are a great help, as there is probably someone there that has had the same problem you are having. I had a serious problem, and as it turns out, a few people there have had the same problem, unfortunately they didn't really know how to fix it.
Problem: Multiple Control Pad PCBs sharing the same buttons:
When you hook up multiple control pad PCDs to the same set of buttons, they will not work. When you turn on one system, that system tries to power both control pads, and neither work. The crosstalk between both controllers muxes everything. The way a lot of people got around this was to make boxes like I did for Xbox to convert JAMMA, or the buttons to different consoles, or use a DB25 switch (like a nice parallel port switch box), or a large rotary switch. I decided to try and find a way to stop the controller PCB crosstalk.
In the world of electronics, diodes work as 'one way gates' letting electrical current flow one way, but not the other. Hooking each button lead from a controller up to a diode and grounding all the grounds from that controller onto a strip (where the control panel buttons ground) would make it so that the controller's button current could still go out and ground to close the circuit, but not flow into another pad, because those pads all have diodes on their wires as well. Just rember with the grounds, ground all Player 1 (P1) grounds together, and all Player 2 (P2) grounds seperately, connecting them to thr respective controller P1/P2 grounds, and JAMMA P1/P2 grounds.

I used a 19 inch television I had lying around for the monitor, and cut a nice bezel to fit it. If you are using JAMMA PCBs I would go with a normal NTSC TV as well, then purchase a RGB to NTSC Video Encoder / TV Converter, instead of trying to convert RGB SCART to a signal that JAMMA can use. Here is a page that instructs you on modifying a Dreamcast SCART cable to work with a JAMMA monitor.
Using your knowledge of how buttons/switches work, (this was covered earlier) You can pull the power and volume buttons off the Television PCB and move them to the top of the cabinet.
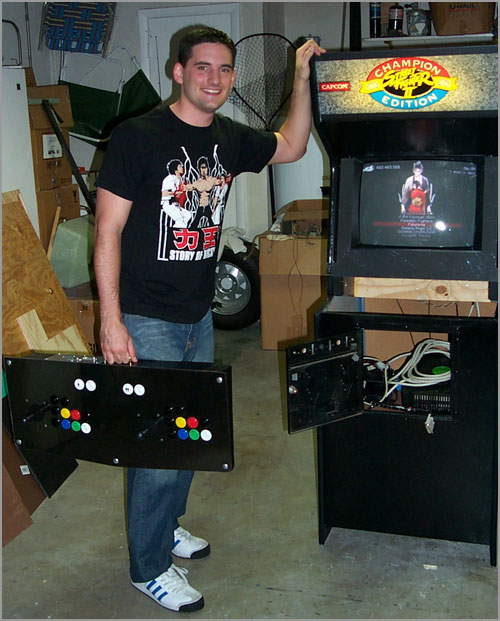
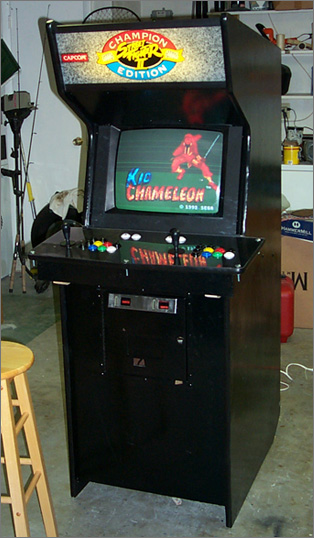
Below you can see it emulating Kid Chameleon, one of the best Sega Genesis games ever!
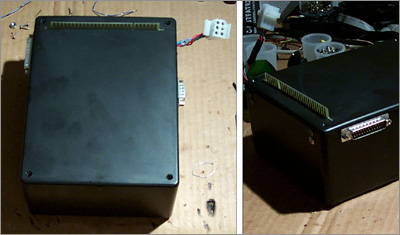
The control panel connects to the cabinet with two very strong industrial latches. It doesn't feel like it's possible to remove it from the cab, and when you take it off, people really freak out; it's great. The control panel has industrial rubber feet, and fits nicely on coffee table; it also has a handle so that you can carry it around. My brother has taken it to many Tekken Tournaments already. As you can see below, when you remove it, there is a metal backplate with two DB25 connectors and a DB15, for JAMMA/JAMMA+, PSX/DC, and the X-Cable, respectively. You can see the DB25-JAMMA/JAMMA+ cable I built, the Xbox Controller cable coiled up (20'), the DB15 X-Cable, and even the Xbox down there. The entire top of the control panel is hinged at the back, and on the inside is a powerful spring loaded locking mechanism, that holds the top firmly down, until you pull up hard enough for it to release.